This is probably one of the worst times of the year to be a travel photographer in the northern hemisphere. Days are short and it’s cold. Which is great if you’re working indoors on post-processing.
Plate full of shrimp / prawns
A while back I had a friend over for lunch and he brought over huge & delicious Ecuadorian tiger prawns. As always, I got a few shots, using natural light coming from outside. I lazily submitted them to multiple agencies, but the background just didn’t make sense and I knew that but decided to submit them anyway (never sold and probably never will). A useless snapshot.
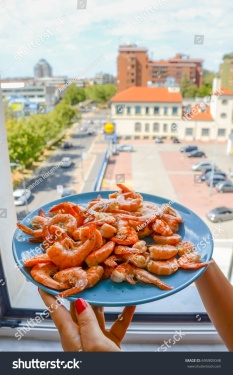
When I took these shots I told myself I would do a composite with a nice seascape background, but naturally I got positively distracted. Yesterday, by chance I stumbled on the images from these days while doing a random search.
After 7 hours of keywording I felt like I needed to do something creative! Small disclaimer, I’m by no means a Photoshop expert which just goes to show that anybody could do this! In fact, I use Lightroom for 90% of my workflow.
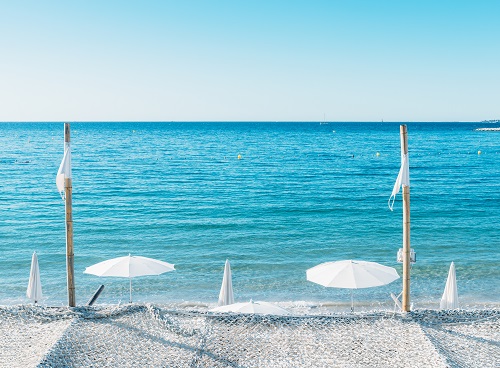
Step 1 – Find a seascape background
I was looking for a bright, sunny, tropical seascape with lots of copy space. Something clean and symmetrical where my story would make sense.
After a few shortlisted, I decided on this background that I captured back in August last year in Cote d’Azur, France:
Step 2 – Open up Photoshop and select the shrimp
A. Carefully, using the Quick Selection Tool, select everything but your subject.
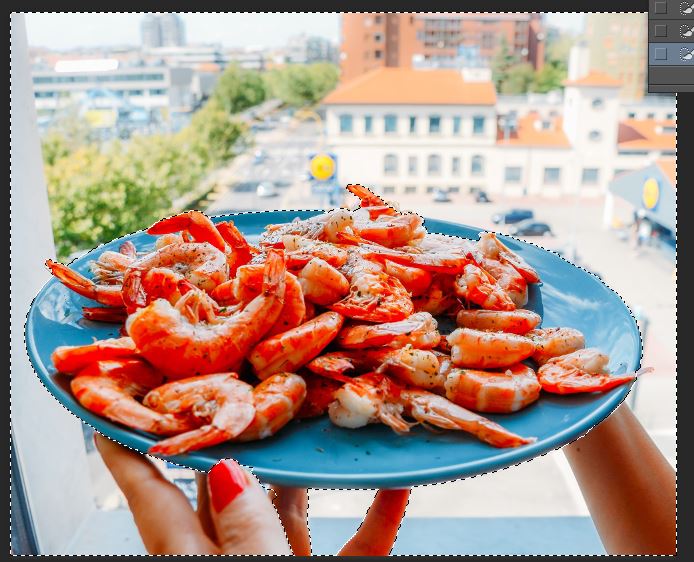
B. Then, carefully fill in areas you want to leave in and remove from the image using the Add to Selection and Subtract from Selection tools on the top.

C. Then, right-click on the image and select “inverse image”. I find this technique easier and more accurate than going straight for the subject. Master Steve Heap suggested I ‘take out’ the right arm as it’s distracting – I agreed.
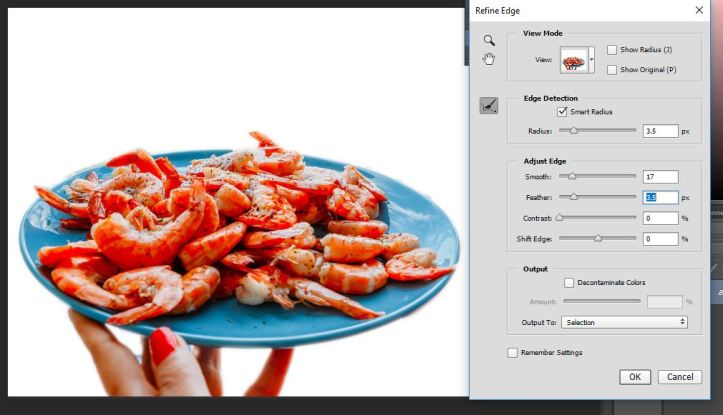
D. Refine edges: I chose the following settings. This will help to blend the background with the subject to make it appear natural.
Step 3 – Blur the Background Layer
This is optional, but I find that blurring the background will reinforce the subject, bringing more attention to the foreground
Step 4 – Copy-paste the shrimp layer onto the background
Next, you’ll simply paste the shrimp layer and adjust its size accordingly. You’ll want it to be at least 30% of the frame.
Step 5 – Change the temperature
You may want to adjust the white balance of the foreground to match the background. In this case, I didn’t feel it needed this type of adjustment.
Step 6 – Add a cool light flare
I feel this adds to the wow factor and also makes it stand out in the thumbnails. Blur the sunlight and flares.
Step 7 – Clone out the posts
Another tip from Master Steve, was to take away the posts to make the image more clean.
Final Look!

Add Caption and Keywords
Caption: Hand holding Prawns / shrimp on a plate at edge of beautiful Mediterranean beach – digital composite
Keywords: tiger prawn, shrimp, prawn, Mediterranean, coastline, beach, background, bay, beautiful, blue, Caribbean, destination, exotic, holiday, horizon, landscape, ocean, outdoor, paradise, parasol, relax, relaxation, resort, rest, scenic, sea, seascape, shore, sky, sunny, tranquil, travel, tropical, turquoise, umbrella, vacation, view, water, wave, composite, plate, food, king prawn, crustaceans, pepper, garlic, pink, delicious, cooked, shellfish
That’s Kosher! 😀
Alex

Very informative tutorial. It shows a lot goes into creating impact on a photograph!
LikeLiked by 1 person
Indeed! As you know, the visuals of a product are crucial to entice the consumer to purchase their product as opposed to competitors’.
Interesting statistic from MDG Advertising is that, articles with images average 94% more total views than those without!
LikeLike
Great end-result! And Thank you for showing the world how you did it 😉
I have to admit that I have never worked with these composite images. I might have to give it a try!
LikeLiked by 1 person
Thanks Borniet, as mentioned, I’m far from a Photoshop expert….so if I managed to do it, I think you should have no problem 😀
Take care
Alex
LikeLike
Thanks Alex, really useful. I’ve tried a couple of food images as studio type shots but never been totally happy with them. I will definitely give this a go.
LikeLike
Awesome. Me neither, food shots for me are usually because I’m eating something interesting and happen to have my camera with me. Often the light isn’t great but I’ll push my luck and with my Nikon D800, it’s surprisingly noise free up to ISO 1000.
This pic for example:
https://www.shutterstock.com/image-photo/bitterballen-typically-dutch-food-croquet-627713576?src=ctJGyahpFlcSvF0GdhU9XQ-1-0
I casually took in pub in Utrecht with bad lighting 10 months ago. Since it has sold on here 54 times for $25 and a few dozen times at other agencies. Makes me wonder how much I could make with some studio set up but it’s not really my thing.
Best of luck!
Alex
LikeLike